
android基础知识12:android自动化测试04—Robotium:实例(上)
前文已经对基于junit的android测试框架有了一个大概的介绍,下面我们对activity测试进行分析。
本文主要举两个基于Robotium的activity测试例子,一个是测试单个activity,一个测试多个activity。
1、Robotium概述
首先,我们来了解一下android的测试类的层次结构:
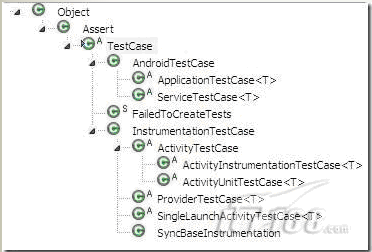
可以看出android中的测试方法主要有AndroidTextCase和InstrumentationTextCase。在这篇文章中,我将介绍Instrumentation这种测试方法,那么什么是Instrumentation?
Instrumentation和Activity有点类似,只不过Activity是需要一个界面的,而Instrumentation并不是这样的,我们可以将它理解为一种没有图形界面的,具有启动能力的,用于监控其他类(用Target Package声明)的工具类。
2、单个activity测试例子
2.1普通测试
我想大家在安装完robotium后,都会试试noteslist 这个例子吧。这个是官网提到的例子
首先打开noteslist 源码
\samples\android-7\NotePad
再打开noteslisttest 源码
可以从上面下载 http://code.google.com/p/robotium/downloads/list/ExampleTestProject_v2.3.zip
要做一点修改。 因为noteslist是在androidV21开发的,而我的测试代码是V23的。我们最好要改成一致的。
修改 noteslisttest 下的AndroidManifest.xml
<uses-sdk android:minSdkVersion="9" />
改成<uses-sdk android:minSdkVersion="7" />
这两个数字表示什么意思呢?
7--androidV21,9--androidV23,最低版本是3--AndroidV15.
大家按顺序排就知道哪个数字对应的版本了
然后在 noteslisttest 右击选中Properties--Android,选中AndroidV21
这样noteslisttest 里带的android jar 由android2.3 变为android2.1
再说一个配置,我觉得也很重要
还是在AndroidManifest.xml 里
<instrumentation android:targetPackage="com.example.android.notepad" android:name="android.test.InstrumentationTestRunner" />
红色加粗的字符串表示我们要测试代码的package
OK,这样我们就弄好代码了。 我们只需要执行Run As--Android Junit test
下面我们看看 noteslisttest 里的具体代码,看看它是怎么测试的
- privateSolosolo;
- //告知系统我要测试的app是什么
- publicNotePadTest(){
- super("com.example.android.notepad",NotesList.class);
- }
- //打开noteslist
- publicvoidsetUp()throwsException{
- solo=newSolo(getInstrumentation(),getActivity());
- }
- @Smoke
- publicvoidtestAddNote()throwsException{
- solo.clickOnMenuItem("Addnote");
- solo.assertCurrentActivity("ExpectedNoteEditoractivity","NoteEditor");//AssertthatNoteEditoractivityisopened
- solo.enterText(0,"Note1");//Intextfield0,addNote1
- solo.goBack();//Goback
- solo.clickOnMenuItem("Addnote");//Clicksonmenuitem
- solo.enterText(0,"Note2");//Intextfield0,addNote2
- solo.goBackToActivity("NotesList");//Gobacktofirstactivitynamed"NotesList"
- booleanexpected=true;
- booleanactual=solo.searchText("Note1")&&solo.searchText("Note2");
- assertEquals("Note1and/orNote2arenotfound",expected,actual);//AssertthatNote1&Note2arefound
- }
clickOnMenuItem(String)
功能是点击Menu按钮,选择文本描述为String的菜单,如我们的例子是"Add note"
assertCurrentActivity(String message,String name)
这个是判断当前的activity是否和我预期的一致
message是描述性的文字
name是指activity的名字
关于如何知道activity 名字,我找了半天的文档,目前的方法是得看源码中的 AndroidManifest.xml--Application label--Application Nodes,在那里我们可以看到所有的activity的name
enterText(int index,string text)
index用来标识写到哪个EditText中。如果当前只打开一个EditText,那index=0
text:就是我们要写入的内容
goBack()
相当于手机上的 返回键(back key)
goBackToActivity(String name)
返回到指定的activity
searchText(String text)
在当前的activity中搜索是否含有text的内容
- @Smoke
- publicvoidtestEditNote()throwsException{
- solo.clickInList(2);//Clicksonthesecondlistline
- solo.setActivityOrientation(Solo.LANDSCAPE);//Changeorientationofactivity
- solo.clickOnMenuItem("Edittitle");//Changetitle
- solo.enterText(0,"test");//Infirsttextfield(0),addtest.
- solo.goBackToActivity("NotesList");
- booleanexpected=true;
- booleanactual=solo.searchText("(?i).*?note1test");//(Regexp)caseinsensitive//insensitive
- assertEquals("Note1testisnotfound",expected,actual);//AssertthatNote1testisfound
- }
clickInList(int index)
点击list表的第index行,进入该文本界面
solo.setActivityOrientation(Solo.LANDSCAPE);
setActivityOrientation,设置手机屏幕显示方式
LANDSCAPE:横向显示
Portrait:竖向显示
- @Smoke
- publicvoidtestRemoveNote()throwsException{
- solo.clickOnText("(?i).*?test.*");//(Regexp)caseinsensitive/textthatcontains"test"
- solo.clickOnMenuItem("Delete");//DeleteNote1test
- booleanexpected=false;//Note1test&Note2shouldnotbefound
- booleanactual=solo.searchText("Note1test");
- assertEquals("Note1Testisfound",expected,actual);//AssertthatNote1testisnotfound
- solo.clickLongOnText("Note2");
- solo.clickOnText("(?i).*?Delete.*");//ClicksonDeleteinthecontextmenu
- actual=solo.searchText("Note2");
- assertEquals("Note2isfound",expected,actual);//AssertthatNote2isnotfound
- }
clickOnText(String text)
点击包含该文字的地方
其中text可以用正则表达式表示
(?i)----忽略大小写。默认情况是大小写敏感的。
正则表达式与java保持一致
clickLongOnText(String text)
长时间按住所选的文字
这里需要注意:被测apk和测试apk必须使用相同的签名。
2.2 数据驱动测试
本例与上一例子都是对于单个activity测试,不同的地方在于本例使用的测试数据来源于文件。
被测试代码是简易计算器,代码:/Files/morebetter/android
code/AndroidCalculator.rar
1. 数据驱动测试架构
测试数据源:TestData.csv
| First Value | Second Value |
| 10 | 1.5 |
| 20 | 3 |
第一个输入框从First Value中读数据
第二个输入框从Second Value中读数据
点击Multiply
比较测试结果和期望结果是否一致,将结果写到文件里
2. 创建数据源文件
格式如上图
3. 把数据源文件上传到Emulator上
在被测试代码中创建res/raw/files文件夹。这样files文件夹就能被上传到Emulator上了
用Eclipse—Run As—Android Application 运行被测试代码
在Eclipse上加载DDMS,点击File Exploer,浏览Emulator-5554的所有文件
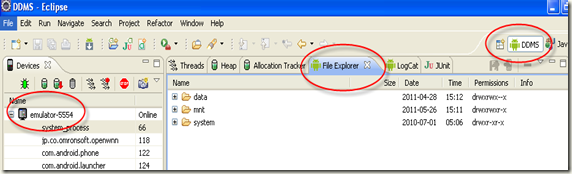
打开/data/data/com.calculator/files, 点击右侧上传到device的按钮,将csv文件上传到emulator上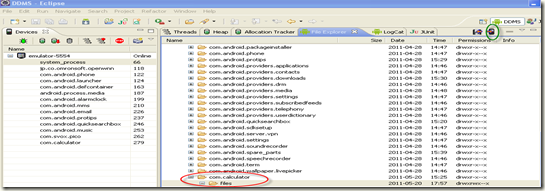
4. 编辑测试case, 代码为:/Files/morebetter/android code/AndroidCalculatorTestApk.rar
5. 运行测试case
6. 将测试结果写到文件里,该文件存放在/data/data/com.calculator/files 下面
7. 将测试结果导入到本地电脑中

3、多个activity测试
在Android SDK中“Resources”-“Tutorials”下有“Notepad Tutorial”和“Activity Testing”两个项目,一个示例是指导你如何快速开发一个Android小程序,一个是指导你如何对项目进行测试,两个项目都适合在入门的时候好好学习。
其中的“Activity Testing”是对“Samples”-“Spinner”项目进行测试,其中包含了UI测试、状态破坏和状态恢复测试。这个项目只有一个Activity,测试起来也不麻烦,细心阅读文档就可以完成。但是一个程序只有一个Activity应该是很难遇见的吧,那么应该对多活动(Multi Activities)的程序进行测试呢?
其实我这也是随便整整,大家随便看看。
在查看SDK关于测试的章节后,有疑问如下:
测试Activity、Service、Provider都是自动化的,那么我们如何控制运行过程?
如何在界面模拟操作,如点击按钮,输入文字内容等等。
新建一个项目,项目名为Login,包名为com.vruc.android.login,程序名为Login,活动名为AuthenticateActivity;同时添加一个项目名为LoginTest,包名为com.vruc.android.login.test,程序名为LoginTest的测试项目。
完整的Login项目:
1.更改main.xml文件名为login.xml,更改代码为下:
- <?xmlversion="1.0"encoding="utf-8"?>
- <LinearLayoutxmlns:android="http://schemas.android.com/apk/res/android"
- android:orientation="vertical"android:layout_width="fill_parent"
- android:layout_height="fill_parent">
- <EditTextandroid:id="@+id/username_field"
- android:layout_height="wrap_content"android:layout_width="match_parent"></EditText>
- <EditTextandroid:id="@+id/password_field"
- android:layout_height="wrap_content"android:layout_width="match_parent"></EditText>
- <Buttonandroid:text="Login"android:id="@+id/login_button"
- android:layout_width="wrap_content"android:layout_height="wrap_content"></Button>
- </LinearLayout>
- publicclassAuthenticateActivityextendsActivity{
- /**Calledwhentheactivityisfirstcreated.*/
- @Override
- publicvoidonCreate(BundlesavedInstanceState){
- super.onCreate(savedInstanceState);
- setContentView(R.layout.login);
- Buttonlogin=(Button)findViewById(R.id.login_button);
- login.setOnClickListener(newOnClickListener(){
- @Override
- publicvoidonClick(Viewv){
- Intenti=newIntent(AuthenticateActivity.this,WelcomeActivity.class);
- i.putExtra(ACCOUNT_SERVICE,((EditText)findViewById(R.id.username_field)).getText().toString());
- startActivity(i);
- finish();
- }
- });
- }
- }
- <?xmlversion="1.0"encoding="utf-8"?>
- <LinearLayoutxmlns:android="http://schemas.android.com/apk/res/android"
- android:orientation="vertical"android:layout_width="fill_parent"
- android:layout_height="fill_parent">
- <TextViewandroid:id="@+id/welcome_message"
- android:layout_width="wrap_content"android:layout_height="wrap_content"
- android:textSize="15pt"></TextView>
- </LinearLayout>
- publicclassWelcomeActivityextendsActivity{
- @Override
- publicvoidonCreate(BundlesavedInstanceState){
- super.onCreate(savedInstanceState);
- setContentView(R.layout.welcome);
- Intenti=this.getIntent();
- ((TextView)findViewById(R.id.welcome_message)).setText(i.getStringExtra(ACCOUNT_SERVICE));
- }
完整的LoginTest项目
1.添加LoginTest.java文件,继承类为android.test.InstrumentationTestCase
2.完整LoginTest.java中测试代码:
- publicstaticfinalStringTEST_USERNAME="TEST_USERNAME";
- publicstaticfinalStringTEST_PASSWORD="TEST_PASSWORD";
- publicvoidtestUserLogin(){
- //注册最开始的活动并运行
- Instrumentationinstrumentation=getInstrumentation();
- ActivityMonitormonitor=instrumentation.addMonitor(
- AuthenticateActivity.class.getName(),null,false);
- //运行活动
- Intentintent=newIntent(Intent.ACTION_MAIN);
- intent.setFlags(Intent.FLAG_ACTIVITY_NEW_TASK);
- intent.setClassName(instrumentation.getTargetContext(),AuthenticateActivity.class.getName());
- instrumentation.startActivitySync(intent);
- //等待Authenticate活动开始
- ActivitycurrentActivity=getInstrumentation().waitForMonitorWithTimeout(monitor,5);
- assertTrue(currentActivity!=null);
- //自动输入预定的用户名
- ViewcurrentView=currentActivity.findViewById(com.vruc.android.login.R.id.username_field);
- assertTrue(currentView!=null);
- TouchUtils.clickView(this,currentView);
- instrumentation.sendStringSync(TEST_USERNAME);
- //自动输入预定的密码
- currentView=currentActivity.findViewById(com.vruc.android.login.R.id.password_field);
- assertTrue(currentView!=null);
- TouchUtils.clickView(this,currentView);
- instrumentation.sendStringSync(TEST_PASSWORD);
- //移除当前活动监视,注册新的活动监视,要在还没有按下按钮前准备
- instrumentation.removeMonitor(monitor);
- monitor=instrumentation.addMonitor(WelcomeActivity.class.getName(),null,false);
- //自动点击登陆按钮
- currentView=currentActivity.findViewById(com.vruc.android.login.R.id.login_button);
- assertTrue(currentView!=null);
- TouchUtils.clickView(this,currentView);
- //等待Welcome活动开始
- currentActivity=getInstrumentation().waitForMonitorWithTimeout(monitor,5);
- currentView=currentActivity.findViewById(com.vruc.android.login.R.id.welcome_message);
- assertTrue(currentView!=null);
- assertEquals(TEST_USERNAME,((TextView)currentView).getText().toString());
- }
4、Activity 启动 Instrumentation 测试
和startActivity 及 startService类似
在activity中 启动Instrumentation 以便调用运行测试项目 ActivityInstrumentationTestCase2
可以尝试如下代码实现
startInstrumentation(new ComponentName("com.example.test", "android.test.InstrumentationTestRunner"), null, null);
5、从Intent中获取数据
大多数Activity在启动时,都会从Intent中获取一些数据。
在使用Robotium测试时,当然也会需要从Activity中获取数据。
可用的流程为
1。将setUp()方法中的
solo = new Solo(getInstrumentation(), getActivity());
转移到每一个testXXX方法中。
2.在该语句前,可以做Intent的注入,例如
- Intentintent=newIntent();
- Bundleb=newBundle();
- b.putParcelable(Account.class.getName(),account);
- b.putParcelable(User.class.getName(),user);
- intent.putExtras(b);
- setActivityIntent(intent);
solo = new Solo(getInstrumentation(), getActivity());之后,例如
有操作本地Key-Value存储的,需要早solo= 之后执行。否则会引起Activity提前实例化。导致Intent注入失败
参考文献:
android单元测试初探——Instrumentation
Activity 启动 Instrumentation 测试
学习NotesList(Robotium自带的例子)
Android Test - Auto Test Multi Activities
Robotium 数据驱动测试框架


发表评论

相关推荐
博文android基础知识05:四大组件之service 02:远程调用中关于远程调用service的实例程序
robotium实例
实现了创建Calculator的编辑过程,可以为进一步的测试用例做准备。
android service的实例程序,用于博文http://blog.csdn.net/xianming01/article/details/7341877
1.Android 自动化测试1:启动app的默认Activity,启动指定Activity 2.Android 自动化测试2: 捕获Element,并定位Element,实现点击、拖、拽、按压等 3.Android 自动化测试3:验证Element,enabled、visible、exist等 4...
根据博客内容,写的一个android 服务实例程序
用robotium进行android应用的测试,这里实现了一个calculator实例,希望对想用robotium进行android测试的人有所帮助。本文根据http://code.google.com/p/robotium官网上下载的文档翻译而成,并经过自己的亲手实践...
本文在已经创建了AndroidCalculator和AndroidCalculatorTest两个project的基础上创建了一个测试用例用robotium对android应用进行测试;本文从http://code.google.com/p/robotium/官网上下载的文档翻译而得,并经过...
使用uiautomator2+pytest+allure进行Android的UI自动化测试 测试携程旅行App,首页-机票-机票搜索模块 简介 使用uiautomator2+pytest+allure进行Android的UI自动化测试 环境搭建 pytest框架 pip install pytest ...
Robotium实例, 官方文件, 入門绝佳
Android开发实例:打电话,讲解开发Android打电话程序
全书分为18章,分别讲解了UI布局实例集锦、控件实例集锦、自动化服务实例集锦、数据存储实例集锦、电话和短信实例集锦、图形图像实例集锦、和网络有关的实例集锦、多媒体实例集锦、Google地图实例集锦、GoogleAPI...
第1章将需要掌握的自动化测试知识依次讲解,这是精心设计的内容。掌握了这些基本技能后就可以进入第2章的学习,里面涵盖了大量真实的模拟项目的例子,以及做项目时需要的一些QTP技术和技巧。学通这两章,读者就可以...
java+selenium+maven+testng自动化测试框架实例(实际项目)
搭建robotium工程,手册和说明,包括android自动化测试工具robotium搭建的实例说明,简易上手!
Android应用开发实例:智慧北京源代码,可编译运行 开发环境eclipse
Android开发实例:打电话.zip
新浪微博Android版实例开发视频教程【】3G手机Android应用新浪微博:发布01-开发概述【】3G手机Android应用新浪微博:发布02-下载微博sdk【】3G手机Android应用新浪微博:发布03-微博客户端主架构【】3G手机Android...
在编写Android自动化测试用例的时候,可能会碰到这样的情况,在一个Android版本的模拟器上运行的好好的测试用例,在另一个版本的Android模拟器上就运行不正常了 在编写Android自动化测试用例的时候,可能会碰到...
Android开发实例:rss阅读器 源码