今天做了一个温度计的应用,需要一个图,能够根据输入的数据将温度计里面的红色图片拉伸。为了达到这个效果,使用了iOS5的函数:resizableImageCapInsets:(UIEdgeInsets)Insets。
其中Insets这个参数的格式是(top,left,bottom,right),从上、左、下、右分别在图片上画了一道线,这样就给一个图片加了一个框。只有在框里面的部分才会被拉伸,而框外面的部分则不会改变。比如(20,5,10,5),意思是下图矩形里面的部分可以被拉伸,而其余部分不变。

据说stretchableImageWithLeftCapWidth:topCapHeight这个函数也能够实现,但是在iOS5里面建议不要使用这个函数。效果如下图: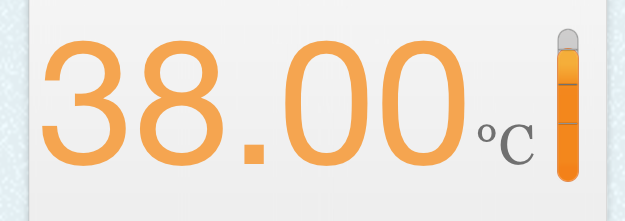
当修改了数据之后,变成这样:

下面来看如何实现。
温度计共由三张图组成:
背景图ThermometerBackground.png:

刻度图ThermometerCalibration:

里面的溶液Calibration:

首先将背景图加入superview中,再将刻度图和溶液图加入背景图中:(为简化起见,一些不必要的代码已经省略)
    //将背景图加入superview
    UIImageView *thermometerBackground = [[UIImageView alloc] initWithFrame:THERMOMETER_FRAME];
    [thermometerBackground setImage:[UIImage imageNamed:@"ThermometerBackground.png"]];
    [self.view addSubview:self.thermometerBackground];
    //将溶液图加入背景图
    UIImageView *thermometer = [[UIImageView alloc]init];
    [self.thermometerBackground addSubview:self.thermometer];
    //将刻度图加入背景图
    UIImageView *thermometerCalibration = [[UIImageView alloc] initWithImage:[UIImage imageNamed:@"ThermometerCalibration.png"]];
    [self.thermometerCalibration setFrame:CGRectMake(0,10,thermometerBackground.frame.size.width,thermometerCalibration.image.size.height*thermometerBackground.frame.size.width/thermometerCalibration.frame.size.width)];
[self.thermometerBackground addSubview:thermometerCalibration];
然后,根据度数生成对应高度的image;
    UIImage* image = [UIImage imageNamed:@"Thermometer.png"];
    UIEdgeInsets insets = UIEdgeInsetsMake(20, 0, 25, 0);
    image = [image resizableImageWithCapInsets:insets];
    int top = 10.00+(38.00-temperature)*20.00;
    [self.thermometer setFrame:CGRectMake(0,top,self.thermometerBackground.frame.size.width,self.thermometerBackground.frame.size.height-top)];
[self.thermometer setImage:image];
在这里,top这个变量就代表了根据度数计算出的溶液的高度。
这样,当改变温度temperature的大小时,只要在viewWillAppear里调用这段代码,就能够动态生成温度计图片了。
分享到:


相关推荐
Demo程序源码 博文链接:https://zhong871004.iteye.com/blog/2287009
如果我们把一张有图片(有特别形状的,特别是类似有圆角的图片)放在UIButton中,当UIButton改变大小是,图片可能会被拉伸并且产生变形,我们可以通过-(UIImage *)resizableImageWithCapInsets:resizingMode:...
很好的一个wpf Slider控件源码,鼠标点到哪里就到哪里,有刻度
stretchableImageWithLeftCapWidth resizableImageWithCapInsets
有关详细信息,请参阅 UIImage 的 resizableImageWithCapInsets:(UIEdgeInsets)insets 方法。 所以它只支持在水平和垂直两侧拉伸一段补丁标记。 安装 复制 SWNinePatchImageFactorySample/SWNinePatchImageFactory/...